Wednesday, July 25, 2012

The kitchen floor part 2

Remember when I said 2.5 hours ago that we'd live with the floor cloth for a bit and see what we think? Well, I changed my mind and made a modification. I decided that I might like it better if it were smaller and just helped define the table area a bit more. So, I trimmed it pretty significantly, and was left with this:

Yep, I think I like it better now.

Alright, over and out, it's almost vacation time!

The kitchen floor

I finally got my act together to tackle the kitchen floor cloth. I'm not sure why I put this off until three days before leaving for vacation, but for whatever reason I've been kind of apprehensive about this one. 


Essentially, I was inspired to make a large floor cloth for our kitchen by the small shoe mat I bought on Etsy for our hallway as well as a whole host of online eye candy. The idea is that a rug would add some color/visual interest to our otherwise very-green-and-gray kitchen, but is a disaster waiting to happen in a kitchen. Spills, cat food, people food, wet shoes as we stumble in with armfuls of groceries, etc. The floor cloth is basically just canvas or another piece of fabric on the floor that's coated many (many many) times with clear polyurethane so that it's fully waterproof and can be wiped clean when an eventual spill occurs. It's not soft underfoot like a rug, but that doesn't matter so much in the kitchen.

Here are some of the various floor cloths from around the interwebs that served as my inspiration:

(dream book design)                                                      (Flea Market Trixie)


(Design Share)                                              (Just About Home)

And here's the one I purchased on Etsy from Jennifer at Room9Design for the hallway awhile back (it's reversible):

The talented creators of the floor cloths pictured above employed some diverse methods.  The one from Just About Home, as well as the one from Room9Design in my front hall, is made from plain canvas with a design painted on (with polyurethane applied as a finish). The ones from Design Share and dream book design are tablecloths, also with polyurethane as a finish. And the one from Flea Market Trixie is actually made by painting on the back side of vinyl flooring.

I couldn't find a tablecloth I liked, but I also doubted my artistic abilities when it came to painting my own design, so I opted for somewhere in between: I bought a few yards of a fabric I liked, and then hemmed around the edges and ironed it. Then I rolled on two coats of water based clear polyurethane on the under side, let it dry overnight, and then rolled on three coats on the top. Here's how I left it to dry overnight, since it was taking up too much room on the floor of the apartment:
I held it up with three small tacks. Gotta get creative in this small space!

Here's the kitchen before:

And here it is with the finished floor cloth in place:

To be honest, I'm a bit ambivalent about this one. I like the addition of some color to the room, but I'm not 100% sold. It ended up wrinkling in a few places in a way I don't like, and I'm not sure I'm a fan of how shiny it is. I think we'll live with it for a bit and see what we think. Comments welcome!

Monday, July 23, 2012

My mom was right

After my bedroom light fail in June, my mom posted: "Maybe the issue is that it is so cylindrical, ie that the sides are straight?" There were many issues with the DIY shade (including that it was too long and narrow), but over the weekend I attempted a fix with a more conical shade shape along the lines that my mom was suggesting, and wouldn't you know it, we love it. Hurrah!

As a reminder, here's what the light looked like in its original ceiling fan form:

I didn't like such a large dark shape against the ceiling, and even though the ceiling fan is great we didn't really use it. So I removed the blades (which can easily just be screwed back in again, no harm done), and the glass bulb fixtures. I was left with this, and assured Sam I wouldn't leave it this way:

Then I left it that way for awhile, before constructing this monstrosity out of embroidery hoops, poster board, and fabric:
For a complete reminder of my drum shade debacle, see this post.

I wracked my brain (and the internet) for alternative ideas for almost a month, and pledged that I would set things right before leaving for my 2.5 week vacation this coming Thursday. Over the weekend we made an impromptu IKEA trip (we made one large purchase, which I'm making some custom changes to and will post about once I finish), and I was determined to find a solution while we were there. I decided to grab a large colorful drum shade (more conical, like my mom suggested, and larger than my homemade version), with the hope that it would do the trick. It came with some metal rods inside for mounting it on a floor/table lamp, which I just pried off. Then I sewed on a few loops of thread that could attach to the hooks I'd already put in the ceiling for the previous shade, and was thrilled when I stepped back to see the final result.

Voila:

I'm quite pleased. It softens the light in a nice way, and the colors tie nicely to the rest of the room.

Here's a closer look at the shade:

Here's a shot looking up from the bed, which is the most important vantage point since it's what I see every night before going to bed:

I used clear globe lights rather than normal bulbs, which I think gives it a nicer look. Overall, I'm happy with the final result and quite relieved to put this project to bed!

Saturday, July 21, 2012

Check-list check-in

This week was my last full week in Boston before starting school! I don't actually start until August 19, but beginning next Thursday I've got some fun adventures planned that will take me away from my home sweet home. Sam and I will be in upstate New York with his mom, stepdad, and siblings from July 26th - August 3rd, then we're home for 12 hours before heading to Chicago for a wedding, and then straight from Chicago I'm flying to Alaska for a week to see one of my best friends who is living there this summer. By the time I return, it will be August 13 and I'll be starting classes in a mere 6 days!


I don't expect to have much internet access on my travels, so I won't be updating the blog very much (plus, I won't be working on home projects to post about!). Maybe I'll share a few pictures of our adventuring, though. In the meantime, I wanted to revisit my summer goals list and see where things stand as I head into my last few days of pre-MBA Boston freedom. So, without further ado:


kitchen:
make a floor cloth (like the one in the hallway, but bigger) [Supplies procured, and this is top of the list to tackle in the next few days!]
paint! not sure yet what color... [I decided not to do this one, but instead I did some accessorizing to make the retro color scheme look a little more intentional...]
sew a curtain for the back door (which we can hang up during the winter, to help make things less drafty)
new light fixture

living room:
new* tv stand, with more storage and color! [I love it! See it here.]
be on the lookout for a new coffee table [I have a totally genius/crazy plan to transform the current coffee table, but need to take a trip to Home Depot to procure some lumber so this may not happen before the summer is out.]

bedroom:
upholster headboard [Decided not to do after swapping out curtains]
replace ceiling fan light fixture [Still haven't figured out what to do on this front after failing here, but I have a few ideas. Must do before leaving for my travels, it's too ugly to make Sam suffer with it while I'm frolicking in the wilds of Alaska.]
lengthen bedroom curtains [Accomplished, by virtue of new curtains!]
expand gallery wall [Here!]
add some more color somehow? [Man, the new curtains really did triple duty on the goals list]

hallway:
new light fixture (chandelier or pendant style) [Check!]
console table [Still on the lookout for the right one!]
organize hall closets [I'm calling this one accomplished, or as accomplished as possible given our space constraints. I donated some things to Goodwill and did some rearranging to make things more organized -- and it allowed me to claim a whole additional shelf for my crafts supplies in in the "linen" closet -- but I have a feeling that retrieving my suitcase from the back of the coat closet will always be a temper-tantrum-inducing event.]

study:
paint built-in cabinet
remove defunct ethernet outlets [After tinkering with them I decided it wasn't a good idea since I'm not in the best position to judge what's "defunct" and what's just "Sage and Sam don't use but future tenant may need" -- so I decided that they're unobjectionable enough to be left alone. Let's face it, it's not really my right to go around ripping out cords from walls -- as much as I change things around here, I never do anything that isn't 100% reversible.]
organize my new filing cabinet! [Yesiree, and I quite enjoyed myself. There are a few photos below for those who are curious.]


So from the original goals list, I'm left with:
kitchen floor cloth
curtain for back door
new kitchen light fixture
coffee table makeover
deal with bedroom light fixture
console table for hallway
paint built-in cabinet in the study


They're probably not all doable in the next five days, but I'll see what I can do and keep you posted! Along the way I've also been doing some random projects that don't really deserve blog mention, but contribute to the overall livability of our home (like a new speaker set-up for our TV and a new printer complete with wireless configuration to our various computers).


The other home-related project I've been working on is a complete inventory of our apartment, including pictures and receipts where possible. We have renters' insurance in case of damage, theft, etc, but in order to actually file a claim we'd need to have pretty detailed records and proof of our belongings. We've had the insurance for over three years, but I'm just now getting my act together with the inventory. I highly recommend insurance for anyone who rents -- ours is $145 a year, and would help cover any losses from theft, fire, water damage caused by our apartment, etc. We haven't needed to use it yet thank goodness, but you just never know. AND, it was very easily transferrable when we moved a few years ago, so you shouldn't let the fact that you move frequently deter you!

Now, without further ado, here's me organizing my filing cabinet:
(That red file folder on my lap is how I was previously storing my important documents. New filing cabinet = significant upgrade.]

Thursday, July 19, 2012

Popsicle stick chic

I've been bad on the blog front. I swear I've been working on projects, but I haven't been good about sharing them in a timely fashion. I kind of stymied myself for awhile with this particular project, which I like a lot but just can't get a good photo of. So I've been delaying posting about it. But the time has come, despite the cruddy pictures.

Since I tackled the hallway makeover, I've been wanting to change the light fixture from the ho hum affair currently in place.
Ho hum:

My plan was to create a chandelier/pendant light inspired by this one that I came across:
(courtesy of Bored and Crafty)

As mentioned previously, I have to rein myself in sometimes and remind myself that a boy lives here, I can't just go around making chandeliers out of crystals/beads/butterflies/pink pom poms and expect him to feel at home too. I liked the popsicle stick chandelier because it felt more unisex (or like a children's arts and crafts project, if you dislike your child enough to let them risk their lives and limbs with a glue gun).

So while in Vermont a few weeks ago, I procured the necessary supplies (yes, it was easier to shop for craft supplies in VT -- when is the Michael's in Porter Square going to open, and how quickly will I spend my entire life savings there? Trick question, I just spent my life savings on my MBA, and I haven't even started classes yet). I needed: embroidery hoops (three different sizes, but I used the ones from my failed bedroom light project for the biggest size) and popsicle sticks.

Here are my embroidery hoops. I chose 14", 10" and 6". Each hoop really comes with two rings, one inner ring and one slightly larger outer ring. For my purposes, I just popped the metal brackets off the outer rings (that's what you use to adjust the width if you're actually trying to embroider something) and used a glue gun to secure them shut.

Then I started gluing the popsicle sticks to each set of embroidery hoops, like so. As you can see, I chose multi-colored jumbo popsicle sticks because I thought the color would be fun.

About an hour and several burned fingers later, I had all three:

Then I attached them to hang together by screwing in three tiny eye hooks evenly spaced around each embroidery hoop, and using short lengths of wire to connect the hooks on the bottom of one hoop to the hooks on the top of the next one, etc. You can kind of see it in the below photo, which is looking down the medium-sized hoop to the small one below it.

I thought it might actually be my first foray into wiring a new light fixture, since I was planning to install it like a pendant light with a bulb hanging down from the ceiling and then the shade around it. I even went so far as to buy all the wiring supplies and pump myself up for turning off the electricity, removing the current fixture, stripping wires, (not) electrocuting myself, etc. But alas, when it came time to remove the existing fixture, I discovered it was being held in place by a stripped/very old screw. Rather than battle the fixture and risk damaging anything, I decided to just hang the shade around the existing fixture like so: 
(with the light on)

(without the light on)

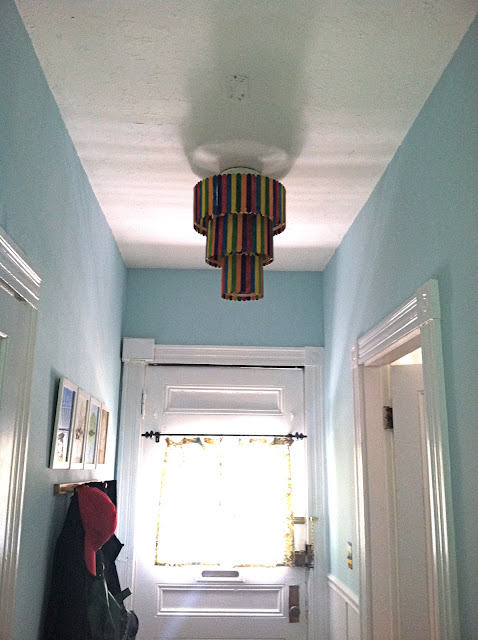
I actually really liked it, but ultimately I felt like it was a little too much for the space in terms of size and color. So I decided to slap on a coat of white paint (the color is still visible, just muted), and remove the bottom segment.

I was left with this:
(light off)

(light on)

As per the disclaimer at the beginning of the post, I really couldn't capture good photos of this space because it's fairly dark without the light on but with the light on it's hard to get a good look at the shade. This is the best I could do, but as usual I'll implore you: come see it in person, it looks better. But actually, the second-to-last photo shows the blue of the hallway more accurately than I've been able to capture it in the past, so there's the silver lining.

So that's that, my hallway light makeover!

Thursday, July 12, 2012

Color Me Happy

As you may recall, these were the items on my summer goals list relating to the bedroom:

upholster headboard
replace ceiling fan light fixture
lengthen bedroom curtains
expand gallery wall
add some more color somehow?


The gallery wall expansion I accomplished here (though it will always be a work in progress), and replacing the ceiling fan light fixture is still ongoing after this big ol' failure. In the meantime, I accomplished the other three items in one fell swoop. Well, sort of.

I was having trouble picking a color scheme and pattern for upholstering the headboard, as I thought it would be a good way to inject some additional color into the room (see goal #5) but didn't want it to clash with the starburst gray curtains or feel too busy with patterns. Then I came across a fabric that I totally loved, like loved so much I wanted to use more of it than just a headboard. So I decided to make new bedroom curtains. Don't get me wrong, I still love my gray starburst curtains that I made out of Target shower curtains (here). I will for sure find a way to repurpose them elsewhere in the apartment. But the minute I finished cutting, ironing, hemming, and mounting the new panels, I knew I'd made the right decision.

Before:

After:
 

Okay, who's really surprised that there's turquoise involved? :) The fabric is from fabric.com


I ordered enough to make four floor-length panels, thus resolving goal #3 (lengthen bedroom curtains). The fabric is 56" wide, and I just left each panel at that width. Making the panels was pretty straightforward, I just cut each one to the right length (93"), ironed down a ~1 inch hem on each side, and sewed sewed sewed.

Here's the other window in the bedroom:

I like how the blue in the curtains ties to the nightstand I painted a few months ago:

The photos don't fully do them justice -- they feel so nice and light and airy in person. So, come visit and see for yourself! As for the headboard, I've decided that with the new curtains I don't want to upholster it. So I didn't exactly accomplish that goal, but I did effectively cross it off my to-do list.

Monday, July 9, 2012

The Mad Half

In all honesty this is only tangentially DIY-related (insofar as it involves a small addition to a previous project, but is mostly about my personal life), but I thought I'd share anyway. I've been away for the last week, up in Vermont visiting with my family and extended family. It was a very nice visit, filled with fireworks, a parade, sailing, golf, good food, one heck of a sandal tan, and fun with family and friends. On Sunday, I capped things off with my first half marathon. It was tremendously enjoyable, if that's possible to believe (with plenty of hills to keep things interesting...), and I beat my goal time of 2 hours 10 minutes by about 7 minutes. Now I have a new race bib to add to our corkboard!


I may want to find a more elegant solution for the race medal, but in the meantime I just put a small nail in the wall and hung it from that. Look at me, I'm a "finisher"!


Here are a few photos from the race, courtesy of Sam -- who came out to run the last 3 miles with me -- and my Mom, who came along with my brother and aunt to see me finish. It was a lot of fun!

The view as Sam and I drove to the race course in the Mad River Valley at 5:15am:  


From 7am to 9:03am, I got to run some amazing Vermont country roads with beautiful mountain views.   Of course, much of the time I was staring at the crest of whatever hill I was currently struggling up, telling myself that what goes up must come down.


Thank you to all the volunteers who staffed the course and -- maybe most importantly -- the water stations! Here's me slowing to a walk as I pass through an aid station so I don't slosh gatorade all over my face while trying to drink it. 

Rounding the corner to the finish, a final sprint past the girl who had been running a bit in front of me much of the way. So satisfying! Thanks to Sam's encouragement, I managed to pass a handful of people in the final few miles that I'd been trailing most of the race.

Finished! Exhausted, but that just means I left it all on the road. I don't think I could have pushed any harder, and that feels great!

Anyway, this post had almost nothing to do with apartment decorating, but I wanted to share anyway since running has been my other hobby for a little while now. Just a word of encouragement for anyone who thinks they could never do this: you can if you want to! I just started running a year ago, and I really stepped it up to train for this race (I was running maybe two times a week before that, about 3 miles at a time). I followed Hal Higdon's training schedule for half marathons (I used the Novice 2 program), which had me running four times a week for 12 weeks. Over that period I ran 200 miles, which meant that by race day I had the most important thing of all: mental confidence that I could do it. Even though the course was tough, I didn't doubt that I'd make it at any point during the race. And it felt amazing to finally cross that finish line!

Sunday, July 1, 2012

Taking on the kitchen

So I have removed an item from my to-do list: paint kitchen. I decided it just wasn't a priority for me in terms of time and money. Instead, I decided to embrace the mint green and go for a more "retro kitchen" look. I've long loved the fifties kitchen look -- basically I wish I could live in a retro diner. Chrome. Formica. Yes please. Plus I realized that many of my kitchenwares are "retro"/"vintage" already, insofar as many of them come from my grandmother who actually had a fifties kitchen. So instead of a giant overhaul, I decided to focus on ways to bring more of the kitchen items I already had (plus a few new ones, I admit) out into the open to provide some pops of color and character.

The one painting thing I did was to finally paint over a giant white area that's been in the kitchen almost since the first day we moved in, in Fall 2010. Back then there was a very old stove/oven in the kitchen, which was awesome aesthetically (definitely fit the retro vibe -- from what I can recall, it looked something like this) but wasn't actually the most functional. Our landlord had it removed and a new one installed almost immediately, though, when it became apparent that the old one was leaking gas (yikes!) and couldn't be fixed. That left a moderate-sized hole in the wall where a vent on the previous oven had  been connected, and our landlord patched it up but never repainted. We got kind of used to it after awhile and never pressed for it to be repainted, until this spring our landlord mentioned it and I said I'd be happy to paint it if he'd just tell me where to find the mint green paint. Last weekend I finally got my act together to take the 10 minutes (plus about 15 minutes finding the right paint in our scary basement) to fix it up, and it's so much better!

Here's a (terrible) before photo of that (terrible) unpainted area:


And now here's the view of the stove. It's totally embarrassing how long I took to paint over that given how much time I've poured into other home projects, it looks sooooo much better now (though still mint green).

The clock I found at Goodwill. I love the dimension and color. In the photo above it looks like a pretty generic wall clock, but in the photo below you can see its depth and coloring more.

And our (new) tea kettle, another splash of red. We've been needing a new one for awhile since ours had a tendency to spill boiling water on your hand when you tried to pour it, so I felt good about picking up a new (and brighter) one.

The shelf next to the stove is pretty much my favorite thing ever (as I've mentioned before), I just love the look of the whole thing with the kitchen supplies for some reason.

On the top shelf are some bottles I saved from wine and such. Okay, maybe it's a little "undergrad unchic," but I like it anyway and the shelf is too high and narrow to really do much with anyway.

Below that is the shelf with our immortal pothos plant -- we've had it for three years and despite the fact that we've killed every other plant we've owned this one keeps on thriving somehow. Next to that is Sam's espresso cup set, and a few kitchen guide books.

Then comes my grandma's spice rack, which is a delicious mix of bronze and wood.

And then of course all the things that don't fit in the well-ordered spice rack...

And then lastly our cookbooks. Plus our knife block, well placed if a baby every comes to our apartment and needs to be able to borrow a chef's knife without asking for help reaching it.

I also finally found a solution to our pot lid problem -- ie that we didn't have anywhere convenient to store the lids to our pots (our pots hang on a bar near the stove that we installed shortly after we moved in). We kept the pot lids in a drawer in the pantry, but more often we actually kept them stacked on the stove because it was a pain to put them away between every use (we tend to use the same lids every day, and the drawers in the pantry stick and are generally a pain to get to because of some poor layout issues). Then I came across a great idea for wall storage of lids: a wall-mount magazine rack. So I found one that fit the bill on Amazon, mounted it next to the pot rack, and voila, a place for our lids!

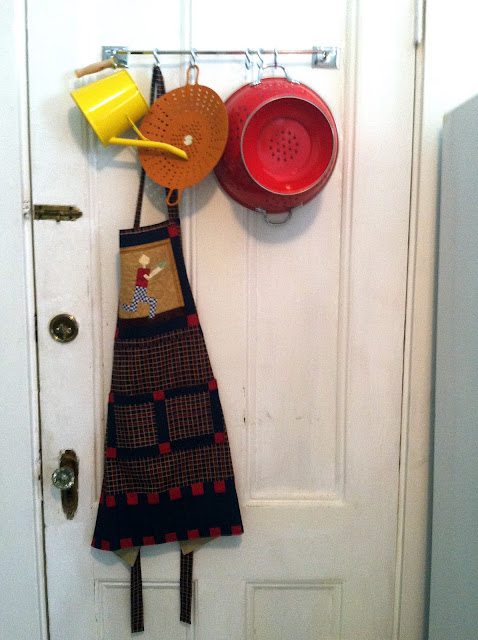
To further accessorize with some of kitchware, I mounted an inexpensive towel bar on the back door (which is situated on the wall between the pantry door and the fridge, see floor plan if you're curious) and bought a few packages of "s" hooks at the hardware store to hang things with. Then I pulled a few of our most colorful items -- yellow watering can, orange vegetable steamer, red colander, and the amaaaazing apron that my mom made for Sam for his birthday. You can see on the bib of it that she quilted the shape of a person running and holding a serving dish, tying to two of Sam's favorite activities: running and cooking. Isn't she the best?

Anyway, I like the new storage for these!


We also have open storage for our silverware. We don't have any drawers in the kitchen large enough for a silverware tray, and see aforementioned description of pot lid issue for why we don't want to use the pantry drawers for daily use things. The wooden caddies we're using for the silverware are from IKEA. I made the artwork behind them using a frame I found on the sidewalk (woohoo), a dish towel with a silverware print from Target that I snagged because I thought it might be fun to use for some sort of kitchen art, and some yellow fabric I had on hand from making a throw pillow cover. Lastly, the green canisters for flour and sugar I found at Goodwill.

In our Central Square apartment, we mounted hooks under our cabinets to hang our mugs and we loved it. In this apartment, the cabinet bottoms are some thin particle board or something and we didn't want to screw into them, so we kept our mugs in a cabinet. Last week as part of my "accessorize the kitchen" kick I bought an accordion wall rack on Etsy and mounted it below the shelf that's above the sink. Then I hung a few of our most frequently-used mugs, plus a dishcloth that my crafty mom made. On the shelf we keep (from left to right) some salt and pepper shakers from my grandma (they have a cute blue flower print and match the rest of our dishware), a jar of brown sugar (I use it a lot in oatmeal), a glass jar with our garlic cloves, a container of chili oil, more salt and pepper shakers (yep, we have two sets on the same shelf -- also from my grandmother, I love these ones too), and some hand lotion to use after dish washing.


Anyway, those are some small things in the kitchen I've been working on that I thought I'd share. Not as dramatic as a big makeover, but sometimes the little things can go a long way to making a space look better and work better. I have a few other kitchen projects in the works to share down the line!