Wednesday, March 28, 2012

The room where we live

I've been making slow but steady progress on the living room - no radical makeover like the bedroom got, but changes here and there. It's still a work in progress, but here's what it looked like at Christmas 2010:


And here it is a year later:


Below is a project-by-project breakdown.

First there was the coffee table, a giant white IKEA monstrosity that we love for its bottom shelf and hate for its appearance. In the battle of form vs. function, we've chosen function for now. But at least I could try to improve the form a little bit. I decide the endless white top wasn't doing it for me:


I thought about covering it or painting it or something, but then I saw a photo of some stenciling that I thought was a cool idea. So in the spirit of Portlandia, I put a bird on it (http://www.putabirdonit.com). More precisely, I ordered some wood-grained contact paper ("walnut"), found some silhouettes of two birds and a dandelion that I liked online, printed and cut them out (just half the dandelion), traced them onto the contact paper, cut out the contact paper, and stuck them to the table. Presto, a little visual interest.

I also made that tray (well, I bought it at Goodwill, painted it two tones of gray, and mod podged a vintage world map from a calendar I had onto the bottom of it). And I made those coasters ages ago, they have pictures of Own in them. Yes yes, the cat is the center of our universe.

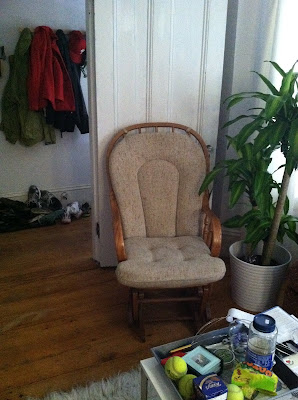
Another project involved recovering the living room rocking glider, which is a great chair but was a lot of beige:


So I got some fabric while on a trip to IKEA, and made new slipcovers for the cushions.

(Note: that throw pillow came with a bird on it, not my handiwork)


Another project was the accent lamp. The before:


First I spray painted it with Rustoleum "Night Tide" (high gloss), then bought a new drum shade (and actually I did this to two lamps since I had a matching set, the other one is in the kitchen). Then a few months later I came across a cool yarn-wrapped lampshade online and thought I'd give it a go. I picked red, burnt orange, and ivory yarn, and wrapped the shade in an ombre design. I clipped a faux flower hair clip to the top, and called it done:


And of course the curtain situation over the stained glass window needed to be remedied. For over a year, we used a map to block the light when we were watching the tv during daylight hours or had company sleeping in the living room who needed protection from the early morning rays:

Oy, that's an embarrassing photo.

I decided to make a roman shade. I used a shower curtain from Target for the fabric (as is my wont, apparently), then followed a few tutorials that involved making loops on various levels of the fabric and attaching those to a hook mounted inside each side of the window sill. So the shade doesn't go up and down on a drawstring like a real roman shade, but you can lower it by unhooking various levels - read a how-to similar to what I did here.


Let's see, I also got new curtains for the rest of the windows in the living room. Another IKEA purchase, just big plain white canvas-like curtains (I think these, the "merete"). Fair warning, this project is a bit of an odyssey, or as much as buying and hanging curtains can be an odyssey. I really wanted something light colored to brighten up the room, but also something heavy enough to block outside light and give plenty of privacy (our living room is on the first floor and has three windows facing the street). Instead of mounting them individually over each window, I bought three curtain rods but mounted them high and wide and kept the finials off the adjoining ends so it looked like one big bar. Then I hung the curtain panels so there wasn't any wall space between them to sort of cheat them to look like a big bay window. The before:


And the after:


I think it makes a big difference. Though when I say "kept the finials off," I'm glossing over the part where I needed to shorten two of the rods - which IKEA's instructions claimed would be easy using some magical tool that I couldn't find on either of my trips to IKEA (oh yes, I had to go there two days in a row because the first time we totally forgot our curtain rods in the check out line after paying for them...better believe I was going back to collect them even though it meant renting a zipcar again and enduring a painful visit to the IKEA customer service counter that involved hearing many bizarre assembly-gone-wrong complaints from fellow customers).

But anyway, back to the shortening of the rods. I couldn't find the right magical tool, but in the instructions it looked enough like a normal hand saw -- which I own -- that I decided to take a risk rather than wander aimlessly around IKEA looking for the right tool for even one more second. But actually, it was not easy. After a long time of trying to do it myself and making it about two millimeters into the first rod, I concluded that I would need to give up on the curtain project altogether and just throw myself into a pouting heap on the floor.

And that's where I lay when my beloved roommate/boyfriend arrived home. Seeing my despair, he offered to help. I explained my plight. He looked skeptical. But he picked up those too-long curtain rods and that hand saw and retreated to the back yard. I heard some truly terrible noises coming from back there (ie the sound of sawing through metal with a non-magical hand saw), but 20 minutes later he returned with one shortened rod. "I don't think I can do the other one, that was almost impossible," he told me. I gave him my best desperate/crazy/I'm-about-to-cry eyes, and he returned to the back yard without a word. Another 20 minutes later, the second rod was cut. He's a keeper, there's no question.

So then I hemmed the panels to just brush the floor and hung them using ring clips. Then I used white tape to secure the three adjoining curtain rod segments to create a more seamless look like it's one big rod (otherwise it just looks like sawed off ends abutting each other). I do wish I had put the rods higher up (but we have such high ceilings, they would be so far above the tops of our windows), but I did have to hem the panels up a number of inches so I could always move the rods up one day and lengthen the curtains. Oh and I almost forgot, if you clicked on the IKEA link to the curtains you may have noticed they were grommet top curtains, ie they are mounted by putting a rod through the large metal eyelets across the top. I bought them knowing that I wanted to use ring clips and would just cut the grommet tops off (by removing the first ~3 inches of of each panel using a pair-o-scissors) and hem them. It added some hemming time because I had to do the top and bottom of each panel (6 panels). But it was good practice on the ol' sewing machine.

One last thing: I had them hung up for a day when I realized that they were driving me crazy when they were closed. Basically they closed really unevenly, bunching up in some places and lying flat in others because there was so much excess fabric. So I took them back down and did something a little odd that I dreamed up while lying in bed contemplating the issue: I measured each window, and divided that number in half. That's the amount of space each curtain panel would need to cover when closed fully (because each window has a panel on either side, and they meet in the middle when closed). Then I cut a piece of ribbon that exact length for each panel, and marked the ribbon with a pen at even increments to match the number of evenly-spaced ring clips along the top of each panel. Then I attached (using hot glue) each mark along the ribbon to a spot a few inches below the corresponding ring clip, so basically when the ribbon was completely taut, it pulled along the back of the top of each panel and kept it in evenly-spaced pleats. Here's a picture of the top of a panel that's completely closed, and you can see (sort of) a piece of ribbon running between the pleats, in case that helps make any sense of it:


So now when you close the curtains by pulling on one end of a panel, it pulls the ribbon taut which bring the whole panel along with even pleats. Okay, I may be a little OCD (I prefer "meticulous"), but now it looks lovely open or closed and that's 100% worth the extra effort.

One more change, which you could see in the recent living room photo: we got a large rug for our living room. Rugs are absurdly expensive, but I really just wanted something pretty neutral (but on the gray side of things). My mom suggested a carpet remnant might be an affordable route (many carpet installers have pretty large remnants available, and they bind the edges so they're just like a regular rug). She was also kind enough to go to a local store near my hometown and report back on their inventory, buy the one that I identified as my favorite through camera phone pictures, and bring it down to Boston on the top of her car when she visited over Thanksgiving (thank you, Mom and Fred!).

A reminder:

I'm a fan - I do love the hardwood, but the rug lightens things up so much, and also is a great insulator in the winter since our floors are quite thin and we're above the cold cold basement.


So, that's about it for projects in the living room (besides the doors and the fireplace, which I've already posted about). Though I guess I made some of those throw pillows (the one on the left is a monogrammed one I wrote about here), and the one on the right is two napkins I sewed together that happened to be the perfect fit for an extra throw pillow I had on hand.

Sunday, March 25, 2012

A Golden Birthday

This year is Sam's "golden birthday" (also known as a "champagne birthday"), because he's turning the age of his birthdate (ie turning 26 on March 26th). So of course we needed to do something special. We had some friends over to celebrate, and had a great time with "golden" and "champagne" as the theme!

Amazon came to the rescue when it came to buying champagne glasses in bulk.


And when it came to gold lanterns, which I strung up above the doorway to the living room.


Much gold. Much champagne (thank you Carrie!).


And a fantastic spread - some of our favorites from Dave's Fresh Pasta (thank you Beth!). We had actual pasta from Dave's as well later in the evening.


Many sparkle lights!


Is the photo out of focus, or just the person who took it at 3am when the festivities ended?


We also had some party activities in line with the theme, like this fantastic treasure chest pinata (thank you Bridget, Karen, and Danielle!).

They filled it with some amazing treasures, including little Goldschlager nips and chocolate gold coins. Also a hefty dose of parachute men and dinosaur toys. Ultimately we were unsuccessful in our attempts to open the pinata inside, since it kept falling to the ground with every thwak. We moved outside, where I pitched it to Sam and he made successful contact. Only some of the toys and nips were destroyed on contact...


For dessert, I made cupcakes. In gold wrappers with edible gold stars sprinkled on top.


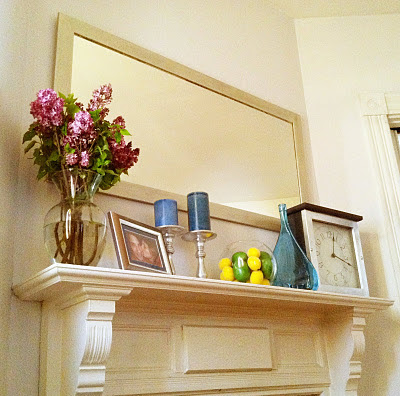
Behold my DIY cupcake stand! It's just a white plate on top of a silver candlestick. I had enough cupcakes for two plate's worth, so luckily I have a pair of these candlesticks - seen here on the mantle performing their more usual function:


It was a lovely evening of good friends, delicious food, sparkling wine, and plenty of shenanigans.

One of my favorite images from the morning-after clean-up effort:

Poor T-rex wind-up toy that lost the top of his head in the pinata explosion. He also lost his right arm, not visible in this picture. What is visible is adorable Mr. Owen in the background.


Wishing a very happy birthday (which is actually tomorrow) to my beloved Sam!

Wednesday, March 21, 2012

Sweet William

Many of our furnishings were generously provided by our parents, and many of those items actually have a lot of family history and sentimental value. I really feel like it adds something to our home - amidst the IKEA and craigslist finds are a lot of what my Grandma M. would call "old friends."

Of course, figuring out how family pieces fit into the style we're developing for our own home is an ongoing process. Sometimes a little experimentation is in order!

These chairs are family treasures from my mom's side. A matching set of four!

I like many things about these chairs, but I think anyone who ever sat in them will acknowledge that they aren't the most comfortable of chairs. So a little over a year ago I decided to increase their comfort quotient a bit. [That's number of times shifting in your seat/(number of hours sitting + number of drinks consumed) -- though using that equation I think I actually want to decrease the comfort quotient, right?]. I'd recently been coming across a lot of DIY chair reupholstering projects in my various internet explorations, and it seemed like a pretty straightforward thing to give a whirl. Plus I knew I'd get to use my staple gun, which my dad gave me as part of an incredibly awesome housewarming present when I moved into my first apartment (a very well-stocked tool box!).

So I spent some time looking around for the perfect fabric. This was during the early days of my turquoise obsession (which I can happily report is still in full swing, 13 months later), and some fabric from Tonic Living caught my attention. It's called Sweet William, in teal (there's also a pink version). [Note: I've subsequently seen it a few times on one of my favorite blogs, Young House Love - how prescient am I?). I ordered a few yards, and also ordered some 2" upholstery foam from the internetz (without a car, I often have an easier time ordering supplies online and being patient than trying to find what I need locally). It turns out Tonic Living is based on Canada, and shipping time was 2 weeks. I displayed much patience.

To make each chair, I started by detaching the seat. That meant flipping the chair over and unscrewing the four screws holding each seat on. Then I traced the outline of each seat onto the upholstery foam using a sharpie, and used an exacto knife to cut around the outline. Then I cut a piece of fabric large enough to cover the top and sides of the foam + seat with a few inches to spare. I lay the fabric on the ground (with the back of the fabric facing up), then lay down the foam and the seat (bottom up). Then I worked around the seat pulling the fabric taut and stapling it to the bottom of the seat. The corners were the hardest because the fabric had a tendency to bunch a lot there, but by folding in the right places I managed to keep it pretty clean looking. Then I screwed the seat back onto the frame. Tada!


I'm a fan - a little bit of color, plus quite a bit more comfortable!

With the leftover fabric, I used my sewing machine (for the first time) and made a pair of curtains for the window in the front door. It just involved cutting two pieces of rectangular fabric and hemming them around each edge. Then I mounted a small curtain rod I had on hand, and hung them using ring clips.


I'm now (13 months later) in the process of planning a hallway upgrade - and the curtains are going to match the color scheme perfectly. Can't wait to get started - this one involves a trip to Home Depot to purchase some lumber. I'll be trying out something a little new, and might get myself some new tools (including the next step up from a staple gun: a nail gun)! Here's a sneak peek at what's inspiring me:

Wednesday, March 14, 2012

A loose screw...or ten

How thrilled was I when I found a quick and free solution to a hardware issue that's been bugging me in the kitchen? The kitchen is the room where I've done the absolute least amount of work, though one of my favorite vignettes (yep that's a decorating term) is in there:


Ah, I love this shelving unit. Vintage spice rack from my grandmother. Espresso set. Cookbooks. Plant that refuses to die no matter how bad we are at watering it and actually just keeps growing. And, as I realized the other day while sitting at the kitchen table while Sam cooked, one of many clear signs that there aren't typically children in our apartment: a knife block on the bottom shelf.

A close up on my favorite two shelves:


In any case, this post is not about some awesome project in my kitchen, because I'm just not yet sure if I'm going to invest in any real changes in that room. (Translation: I'll probably paint it at some point in some fit of madness this summer.) What the post is about is how annoying it was that all the knobs kept coming loose on the kitchen cabinets no matter how much I tightened them. But I read about a nifty little trick using a household item I have in stock aplenty: clear nail polish. I just screwed off the knobs one by one and coated the screws in the nail polish like so:


Then I screwed the knobs back on before the nail polish dried.


Done.

Yep, really that easy. And so quick I did it while I was also making these:


Best way to celebrate a home improvement success!

Sunday, March 11, 2012

Update: moroccan lanterns in action

As promised, here is a picture of the moroccan lanterns (which I first posted about here) in action - I recommend using votive candles. The photo doesn't fully do them justice, since I have a terrible camera - in real life the light is much softer.


A reminder, here's what they look like unlit:


And, in anticipation of the next round of questions, here's what they look like in the 1970s (historical reenactment courtesy of instagram):


Saturday, March 10, 2012

Bedroom makeover: curtains and throw pillows

After painting the bedroom yellow and gray (detailed here), we needed some new bedroom curtains since the ones we had clashed with the new paint. For the new curtains, I knew I wanted to hang them using ring clips, which meant new curtain rods as well because the white utilitarian rods we had were too unattractive to have out in the open like that (they really work best for curtains with a rod pocket, where they're essentially invisible).

Curtains, however, seem to be one of those items that are waaaay more expensive than you think they should be. And maybe I would have been willing to splurge a little if I had found something I absolutely loved, but even looking outside of my ideal budget I couldn't find anything that pleased me sufficiently. Eventually, I made the trek to Target where I wandered up and down the curtain aisle unhappily trying to decide between a few options I only kind of liked. Then I decided to check out the shower curtain section, curious to see if there might be anything there I could fashion into bedroom curtains.

Aaaaand, jackpot. There were a number of shower curtains I thought would make adorable bedroom curtains, and at 72" by 72" I knew I only needed to buy two and then cut them both down the middle to make four panels (two for each of my two windows). The curtains would definitely be on the short side (I had wanted floor length curtains), but I figured I could always buy some additional fabric at some point and lengthen them. Given how much cheaper two shower curtains would be than four window panels (especially floor length ones), I'd still come out way ahead even if I had to buy a few yards of fabric.

Ultimately I settled on a gray curtain with a sunburst pattern. As planned, I cut them both down the middle and hemmed them. Then I bought two curtain rods from the hardware store (also way more expensive than I'd prefer), and a few sets of ring clips. I mounted the curtain rods high and wide to make the windows look bigger, and on the one behind the bed installed the rod somewhat off center so that when the curtains were mounted it would look like the bed was centered on the window when in fact it's not (we can't move the bed to actually be centered because of space constraints).

A few months later during the second phase of the bedroom makeover, I hung christmas tree lights behind the sheer curtains (we have the same sheers on all our windows under our other curtains, since we're on the first floor and want to have the privacy all the time but not always have light-blocking curtains closed). So, the before:


And the after:


And a little closer up on the throw pillows:


The yellow and gray fabric I found when I was shopping for some linen for another project. I sewed it into covers for a few throw pillows I already had on hand, and then I used leftovers from the linen project (which I'll post about soon) to make a third throw pillow cover. Before putting it on the pillow, I embroidered an S on it. Apropos for our apartment.

To make the S, I played around with a bunch of fonts in Microsoft Word. I think I ultimately settled on Times New Roman, how exciting. I made it large and bold, printed and cut it out, and traced it in the center of the pillow case using a pencil. Then I hand stitched over the tracing using red thread (doubled over a few times to make it thicker - I could have used embroidery floss instead if I had been able to find the deep red color I wanted). That's it! I made a second one that's in the living room.

A closer look at the stitching:

Sunday, March 4, 2012

A little splash of color

I saw some DIY moroccan lanterns on DesignSponge about a year ago, and decided I wanted to make them to decorate a little outdoor space for us over the summer. I didn't get my act together to do that (partially because our only option was the front porch, and ultimately we decided we'd never spend much time sitting at street level greeting the near-constant flow of upstairs neighbors coming and going). But twelve months later, I finally decided to do the project after I found myself at Michael's able to pick up the necessary supplies (glass paint and gold puff paint).

First, I used Goo Gone to clean the labels off some pasta sauce jars I'd been saving (I like to keep them on hand for projects, but I swear I have no more than one or two unused ones in my craft closet at any given time, I'm not hoarding recyclables I promise). Then I used gold puff paint to draw designs on the outside of three jars.

Warning: until the paint dried, I thought it looked pretty terrible - it was more shimmering brown than gold, which was not the look I was going for!


This last one was really wonky - I had a hard time keeping the design symmetrical, due to my poor artistic abilities. I told myself that maybe I'd be able to clean it up with an exacto knife when the paint dried, and if not I'd get rid of this one.


Then I waited a day for the gold paint to dry. The next step was to paint the inside of each one with glass paint (I used Pebeo Vitrea). The first coat I did looked very streaky, and again I thought it looked terrible until the paint dried. I did a few coats to deepen the color. It was tough to paint the convex curves in a few places, because I couldn't angle my paint brush the way I wanted inside the jar. My main piece of advice to avoid this is to cover the curviest places with gold paint, so that they aren't parts that need the glass paint down the road.


In the process of painting.

And the finished product, below. I was, in fact, able to use an exacto knife to trim the dried gold paint, so I used that technique pretty heavily on the yellow lantern to even out the design. For $10, I'm pretty pleased with the outcome!


For an update on how they look in other lighting schemes/decades, see my more recent post: Moroccan lanterns in action.